Quickly Get Ansible up and Running
I’m finally starting to settle into a personal routine that is able to afford me a few free minutes to get blogging again. Since the last blog I wrote about playing with Ansible a bit and then giving Python a shot, I have played around with both and really drove home what I very much already knew: I am notsogreat at programming. I was able to get Python to work, and do a couple of cool things, but the barrier to entry is significantly higher than Ansible if you are coming in cold. The main point of this blog is to provide practical knowledge and solutions that Marines are able to put into practice, so I’m going to shelve even attempting to explain any of the Python stuff. I like Python, and I’m hoping I get to a place where I am able to invest the time to be at least decent at it, but that time is not now, and it likely won’t see much coverage on this blog. So onto the main point of this post…
The first time I got into Ansible, I followed a how-to guide, which involved manually creating a file structure, and a bunch of editing in vi, which is terrible (for those who are not daily Linux folks). With a couple of lessons learned, you should be able to be up and running playbooks in closer to minutes than hours. Start off by doing these things:
- Get a decent code editor. I ended up using the free version of Microsoft Visual Studio Code for Mac
- Don’t build out a VM, just import an appliance in GNS3 (I used the NetworkAutomation appliance)
- Use Ansible Galaxy to build out your file structure (explained below)
- Copy code you’ve written in your editor and paste it into the appliance, and most importantly – use nano instead of vi
Basic setup stuff I did prior to getting started was putting 3 routers together on a topology and setting up routing between them all and a LAN segment off of one of them. That LAN segment has a router serving as DHCP server for the NetworkAutomation appliance. Change boot settings of NetworkAutomation appliance to use DHCP. If you don’t already have a base 3 router topology saved in GNS, I’d recommend you keep one, it has saved me a decent amount of time. Make sure you have SSH setup on all of those routers. As you will see later in the config file, I just used Ansible as a username and password to keep it simple.
After the basic setup, getting Ansible in a position to run commands is WICKEDLY simple. Start by testing connectivity to your routers by SSH’ing into each. This also serves to get the appliance to know and trust the SSH certificate for the routers. There are other ways to get this done, but again, this is super simple.
Next, type the following command:
ansible-galaxy init <your name here>
This command will setup the Ansible file structure for you, under the name you end up using (don’t type either of < or > and just put your name in there).
Next, you need to create a file that tells Ansible the devices you have in your inventory. Under the newly created folder you named, create a file named “hosts” with the following info in there:
[routers]
R1 ansible_host=192.168.1.0
R2 ansible_host=192.168.1.1
R3 ansible_host=192.168.1.3
[routers:vars]
ansible_user=ansible
ansible_ssh_pass=ansible
ansible_network_os=ios
Pretty common sense, but you can see the three routers I had and the IP addresses I used for each, so make sure you update that IP with whatever you use, and then under the vars are the username and password to SSH into the device. There is definitely a better way to do this (using Ansible vault), but I wanted to give you a quick way to just get in and start automating router configs, and you can clean stuff like this up as you get more refined.
Next, use nano to create a file called iosconfig.yaml and once you have the file open, paste the contents from this github link in:
https://github.com/john-occasionally-blogs/Ansible-blog/blob/master/iosconfig.yaml
This file will reference the routers you defined by IP address in the previous step, and then Ansible will SSH to each of them individually, and configure the commands that you have listed in a text file (which we will create in the next step). Then if Ansible determines changes were made, it will save the running-config before moving on to the next router.
Use nano again, this time to create a file called change.txt. Put the commands you want in there, and save the file. My text file contained the following info:
username user1 priv 15 secret password
username user2 priv 15 secret password
access-list 2 permit any
access-list 3 deny any
The iosconfig.yaml file you created in the previous step was your Ansible playbook, and all you need to do to run it is type the following command:
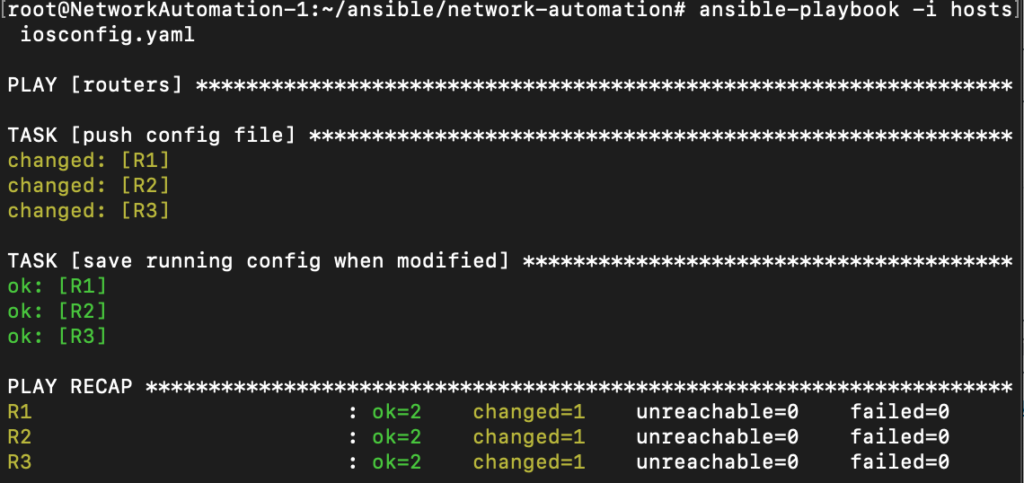
ansible-playbook -i hosts iosconfig.yaml

This is what it should look like when you are done running your playbook. You can SSH into your routers to confirm the changes were made, but it is pretty simple. Try changing things around in the change.txt file to play around a bit.