Using OSPF With ANW2
When I wrote this post about how to route your ANW2 networks, the only options were static (which I recommended) and RIP (which is a poor choice for this environment). I’m a bit late on putting this post together, as we’ve had another option for a good while: OSPF (Open Shortest Path First). OSPF, which is used extensively in the other armed services, is an excellent and modern protocol suitable for ANW2.
Before we go into the configuration to get this up and running on your network, I wanted to provide you a little background on OSPF. The expectation is that if you are reading this you understand EIGRP and how it works. OSPF is a link-state routing protocol, as opposed to EIGRP which is a distance-vector. Link-state routing protocols know about how ALL of the connections in an area are made, where distance-vector protocols know how to get to directly connected neighbors and the networks those neighbors can reach (not HOW they can reach those networks). Link-state routing protocols will use more resources, but because they have an awareness of the topology, they do not need to use the loop prevention mechanisms their distance-vector alternatives do (these mechanisms are what make RIP a poor choice for ANW2). OSPF uses a concept called areas to break large networks down into more manageable pieces, and every OSPF routing domain needs to have at least one area – area 0. One design rule of OSPF is that every area much touch area 0. Unless you are working in a joint environment where OSPF is the LAN routing protocol, I would not recommend using anything other than area 0. Outside of configuring an area, which is done as part of your network statement, the configuration of OSPF is very similar to EIGRP.
Let’s take a look at how to do this in your CPA (Communications Planning Application), and then we will head over to the CLI and finish the job.
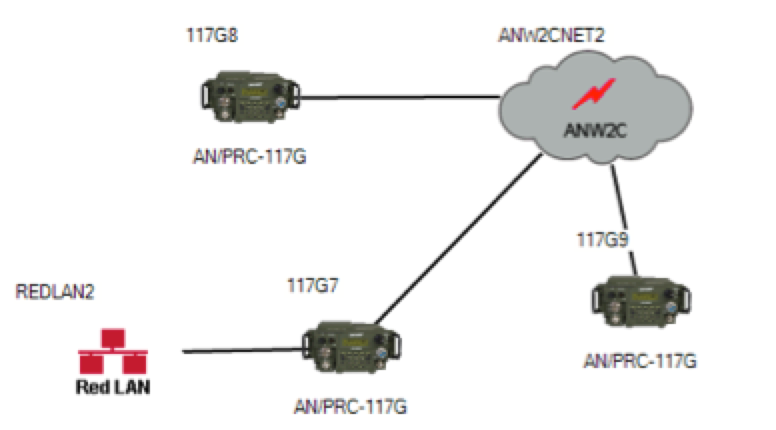
Start with your topology, which should include a couple of radios attached to endpoints (117G8+9 above), and a REDLAN/Edge radio (117G7).
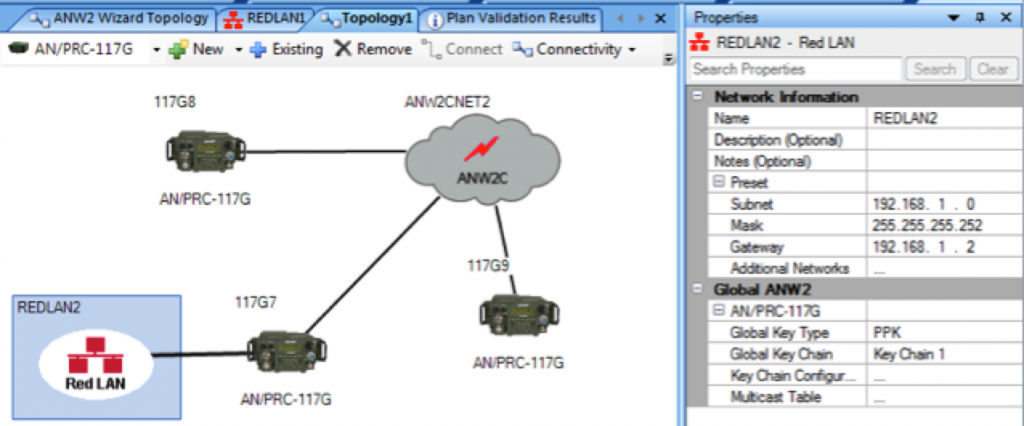 Configure your REDLAN with IP addresses suiting your environment (you can look here for my recommendations on this).
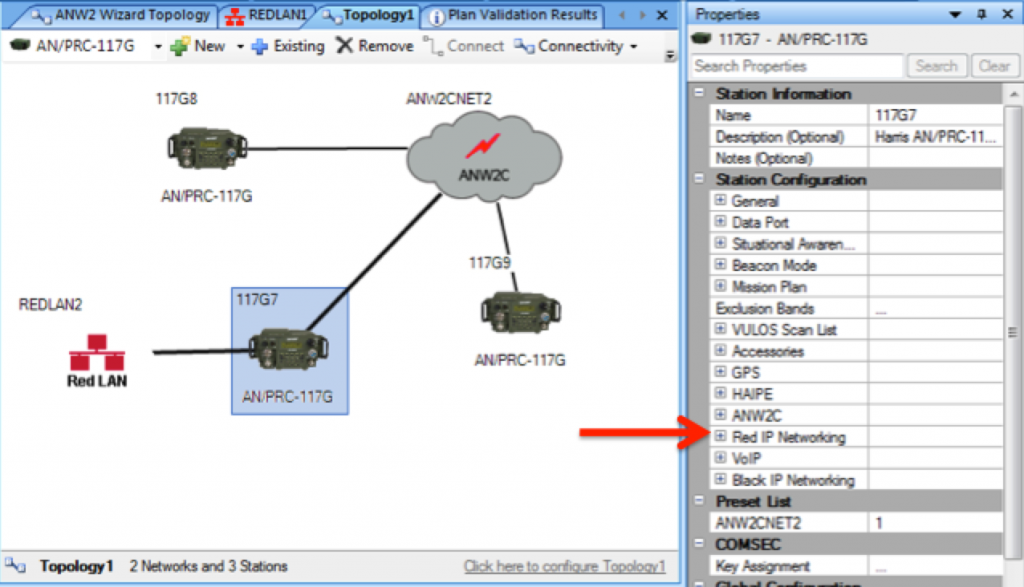
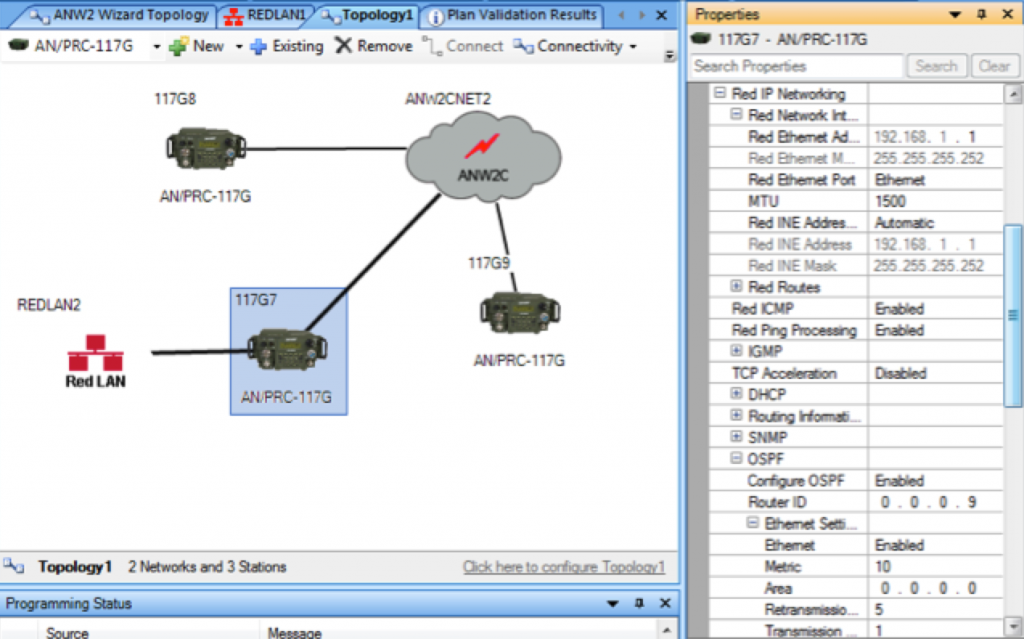 Click on your REDLAN/Edge radio. On the right hand pane, click to expand “Red IP Networking” (where the red arrow is pointing). Then click to expand “OSPF”. The Red Network Interface config is the same as you would have previously configured it. For the OSPF portion, enable OSPF, assign a router ID (in IPv4 address format), and assign an area (in IPv4 address format). The router ID needs to be unique. I would recommend just setting the router ID to the radio number (I goofed and assigned 117G7 a router ID of 0.0.0.9 instead of 0.0.0.7, but sadly I do not have these just sitting around my house to lab out anytime I want).
From here you will need to click on all of the other radios in your topology and assign them appropriate IP addresses, enable OSPF, assign unique router IDs, and put them in area 0. Not too bad, right?
Now we head over to the router side of the configs. I put together a quick lab of three routers to simulate what this would look like. After we are finished with the configurations, I will show you what it should look like if this was done properly. To start things off, hop on your edge router (or switch, whatever you plugged your REDLAN/Edge radio into).
 The commands you see above will setup OSPF to “speak” to your ANW2 network, and will tell your radios how to “get out to the world”. The network command needs to correspond to the IP network you configured back when we were in the CPA (if you look back at the graphic, the radio IP was 192.168.1.1/30, which has a network ID of 192.168.1.0 and /30 corresponds to a wildcard mask of 0.0.0.3). If you have a hard time with the wildcard mask, you can just type it as a subnet mask and the router will “fix” it for you. Next line is “default-information originate”. This injects a 0.0.0.0/0 into OSPF, which effectively tells all of your radios to send their traffic to your edge router to get to the internet. You do not need to configure a router-ID on your Cisco router for OSPF to work, it will take care of that for you. If you are one of those OCD types, you can manually set it if you like under router-configuration mode, just type “router-id <IPv4 address>”. Just remember this needs to be unique.
The last step we need to accomplish is to tell the rest of our network how to get to the ANW2 networks. We used OSPF for the ANW2 routing, but the rest of your network is using EIGRP. A process called redistribution is used to take those OSPF routes and place them into EIGRP, which will allow your network to get to your ANW2 radios. As you can see in the graphic above, we use the redistribute command to redistribute “ospf 1” into EIGRP. The commands after OSPF assign a seed metric, which really just converts OSPF numbers into EIGRP numbers. I would recommend you just use the EXACT numbers I used in the example (the numbers correspond to bandwidth, delay, reliability, load, and MTU).
Let’s take a look at what happens after these commands are entered:
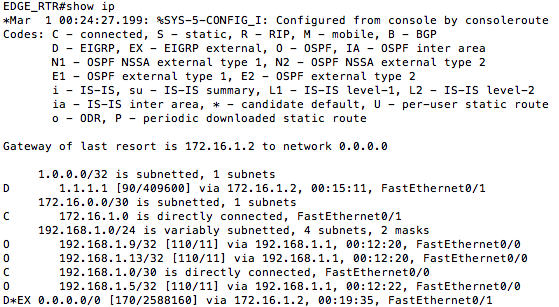
This is the routing table for your edge router. You should be getting a default route from your DSID, and (probably for the first time you’ve seen on a live network) there should be OSPF routes (denoted by an O on the far left). These OSPF routes should ONLY apply to networks you were assigned for ANW2.
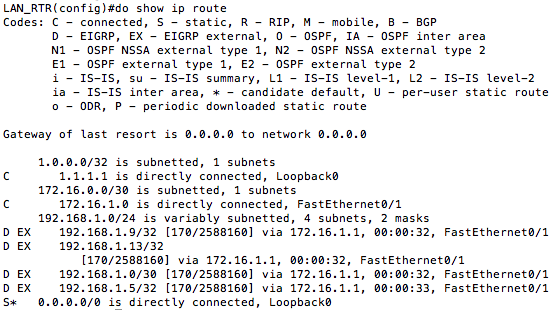
I included the above graphic because someone is bound to ask about what you did. Notice there are no OSPF routes here (not marked with an O on the left)? There are two reasons for this: 1) you are not going to be running OSPF on any of your LAN routers, hence no “O” routes, and 2) you redistributed those OSPF routes into EIGRP. Your data guys will not be used to seeing EIGRP external routes (“D EX”). If you do not see your assigned ANW2 networks on your LAN routers as external EIGRP routes, your ANW2 network will not work properly.
If you find yourself on ship trying to do this, it is significantly different (because the ship will already be running OSPF). If you need help contact me and I would be happy to assist.
