QoS Demystified
Quality of Service (QoS) was a topic that immediately caught my curiosity when I first learned about it. I’m pretty sure I was drawn to it because it sounded too good to be true, or maybe it was because the initial explanation did not make complete sense. I got my first real experience with it while studying for the ONT exam that used to be part of the CCNP. Between ONT, the actual QoS certification, and CCIE training with Marko and Narbik, I’ve come to the conclusion that Layer 2 QoS is not worth the effort and configuration complexity. Additionally, the audience I mainly target with this blog is highly unlikely to saturate their LAN bandwidth. Applying QoS on a Cisco router is a three step process:
- Classify traffic- assign traffic you define to groups. This is simply a grouping, it does not actually “do anything” with the traffic. To do this, we will use class maps.
- Define an action for your traffic classes. There are lots of options here. You can rewrite QoS values, assign bandwidth, and shape/police. To do this, we will use policy maps.
- Apply your actions to an interface. To do this, we will use the service-policy command.
Now that we know the basic steps, the next thing we need to do is go into the intricacies of the command line to make this happen. These configurations are done using something Cisco calls the Modular QoS Command Line (MQC). This means we are able to use portions of the commands we create in multiple different places. An example of this would be the same voice class could be used in multiple policies or using the same policy on multiple interfaces. To complete Step 1, we are going to make class maps. Before you create a class map, you need to know what you would like to do. Specifically, you need to know if the class you are about to create needs to match a single criterion, multiple criteria, or one of a number of criteria. The default when you create a class map is to “match all”, meaning that for a packet to be placed in the class it needs to match every statement that you make. An example of that would be a packet in a certain subnet that is also marked with a certain DSCP (Differentiated Services Code Point) value. In some cases though, the default could be misapplied. Here is an example: 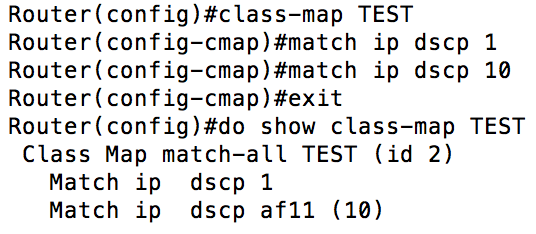 Because there can be only be one DSCP value per packet, no packet would ever match the “TEST” class that is created above. Here is a more appropriate use:
 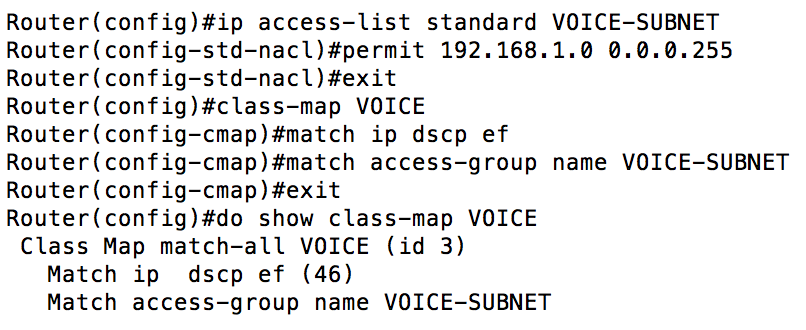 In the example above, to be placed in the VOICE class, you would need to have a DSCP marking of EF (Expedited Forwarding) and be in the 192.168.1.0/24 subnet. If you wanted to define a class with multiple conditions where you only need to match a single condition, it would look like this:
  Now that we have a handle on the difference between match-any and match-all (with match-all being the default behavior), let’s take a look at the different options we have for classifying traffic:
 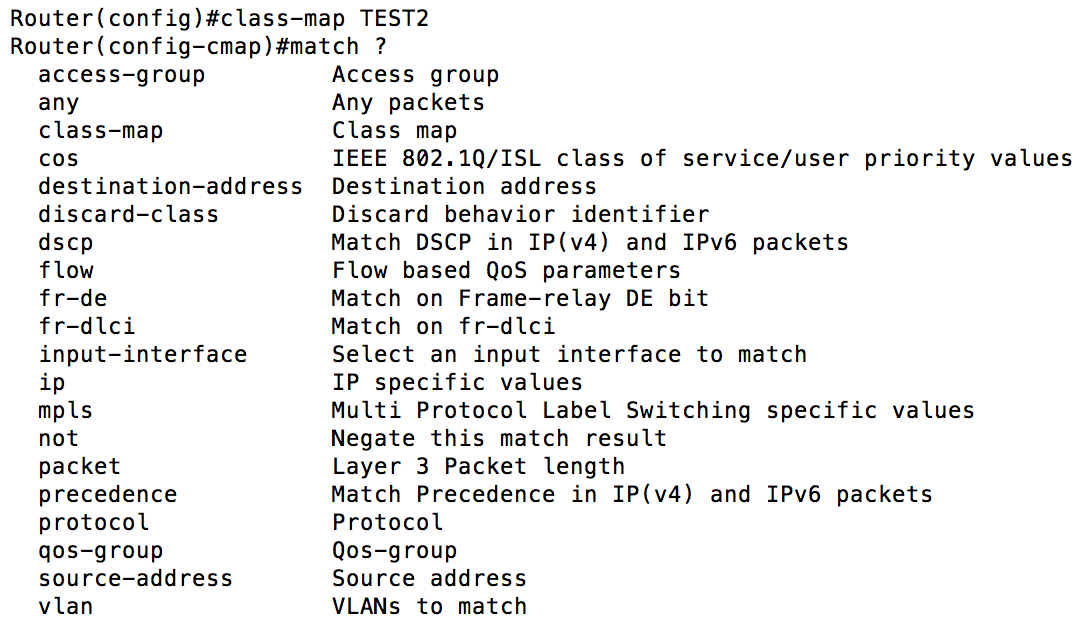 From the capture above, you can see there are several options we can use. In previous examples, I’ve showed you how you can classify using an ACL and DSCP markings. You can also use something called NBAR (Network Based Application Recognition) by using “match protocol”. Additionally, you can use previously created classes using the “match class-map”. One of the things I like to do is create a class called “VOICE”. “VOICE” uses the match-any condition and has class-maps “UNCLASSIFIED_VOICE” and “CLASSIFIED_VOICE” under it. That is it for Step 1. Create as many classes as you need to and then it is time to determine what to do with those classes. The strategy that makes the most sense for Marine Corps (and most modern employments) is to use what Cisco calls LLQ (Low Latency Queuing). This pairs a priority queue with several class-based weighted fair queues. The priority queue gives the packets assigned to it front of the line privileges. You need to be careful with the priority queue because if it is assigned too much bandwidth, or too many protocols are assigned to it you can starve out your other traffic. I generally start out with about 25% of my bandwidth assigned to the priority queue and tweak from there as necessary. It would look like this:
 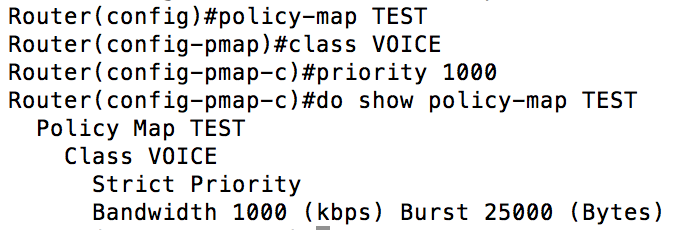 We’ve covered the priority queue, now let’s take a look what the other queues will look like.
 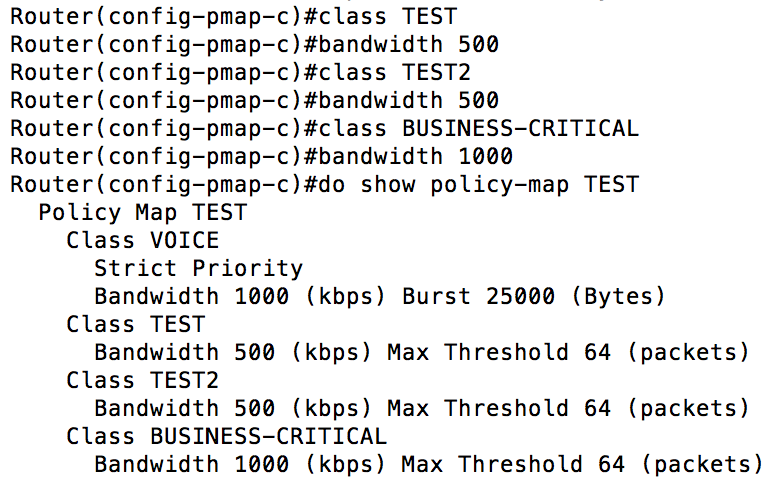 As you can see from the graphic above, the classes we created earlier were assigned various bandwidth values. Keep in mind, the numbers entered represent the minimum guaranteed bandwidth in Kbps (this is important because Cisco does not keep this consistent, as we will see bps later in our configuration). When in doubt, use the “?” before you enter the value, the context sensitive help will remind you which is which. You would think, based on the output above, that our policy-map TEST has four classes, but it actually has five. Every policy-map you create will have a “class-default” queue. This queue will contain all of the packets that do not match any of the other classes that you have defined. It is important to note that you are only allowed to assign up to 75% of the interface bandwidth. There is a command you can use to change this value, but I would recommend you just stay within Cisco’s recommendations. I mentioned earlier that you could not only assign a priority queue and additional queues with a policy-map, but that you could also police or shape your traffic.
The main difference between policing and shaping is what happens when you reach your maximum bandwidth. It can get very complicated, but a brief generalization is that policing will drop traffic that exceeds the maximum, where shaping will buffer the traffic. Shaping will not work inbound (plus the router won’t let you apply it that way). In our environments, there isn’t much use in policing inbound because at that point, it has already crossed our satellite link. With us only concentrating on outbound traffic, the question is whether to police or to shape. For tactical networks I prefer to shape because it is the most efficient use of the limited bandwidth we are allotted. By buffering your traffic, you will create a more smooth traffic pattern, where if you police you will also not exceed the bandwidth you have set aside but the traffic pattern will be more jagged from the abrupt drops. Here is where it gets a bit tricky. You can’t apply a shaping or policing policy to one of your policy maps as a whole, you can only apply when on a class by class basis. On top of that, you would not want to apply this to one of your classes because if you were do so, you would significantly limit the dynamic nature of your IP traffic. Specifically, shaping at 4Mbps is significantly different than shaping at 1 + .5 +.5 + 1 + 1Mbps. Shaping the entire policy would theoretically allow for a single class to use the entire 4Mbps, where individually shaping in the example provided would max out at 1Mbps (and would then have the same limitations that multiplexers using TDM, which is an inability to dynamically utilize unused bandwidth).
So how do we get past this? Just like we previously nested multiple classes in a single class map, you can nest an entire policy map in a class within another policy map. Here is what that would look like:
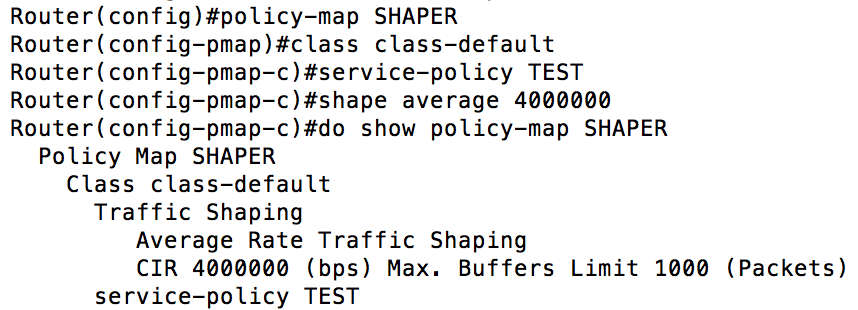 The default class we previously talked about (class class-default), which is always there, can be used as the single class that we nest our previous policy map within. You shape the class default as well. Pay attention to the bandwidth. In our policy map, each class is allocated bandwidth in Kbps, however, when we define our shaped bandwidth it is done in bps. This can seriously affect the performance of your network if misconfigured (8Mbps vs 8Kbps would be a noticeable difference).
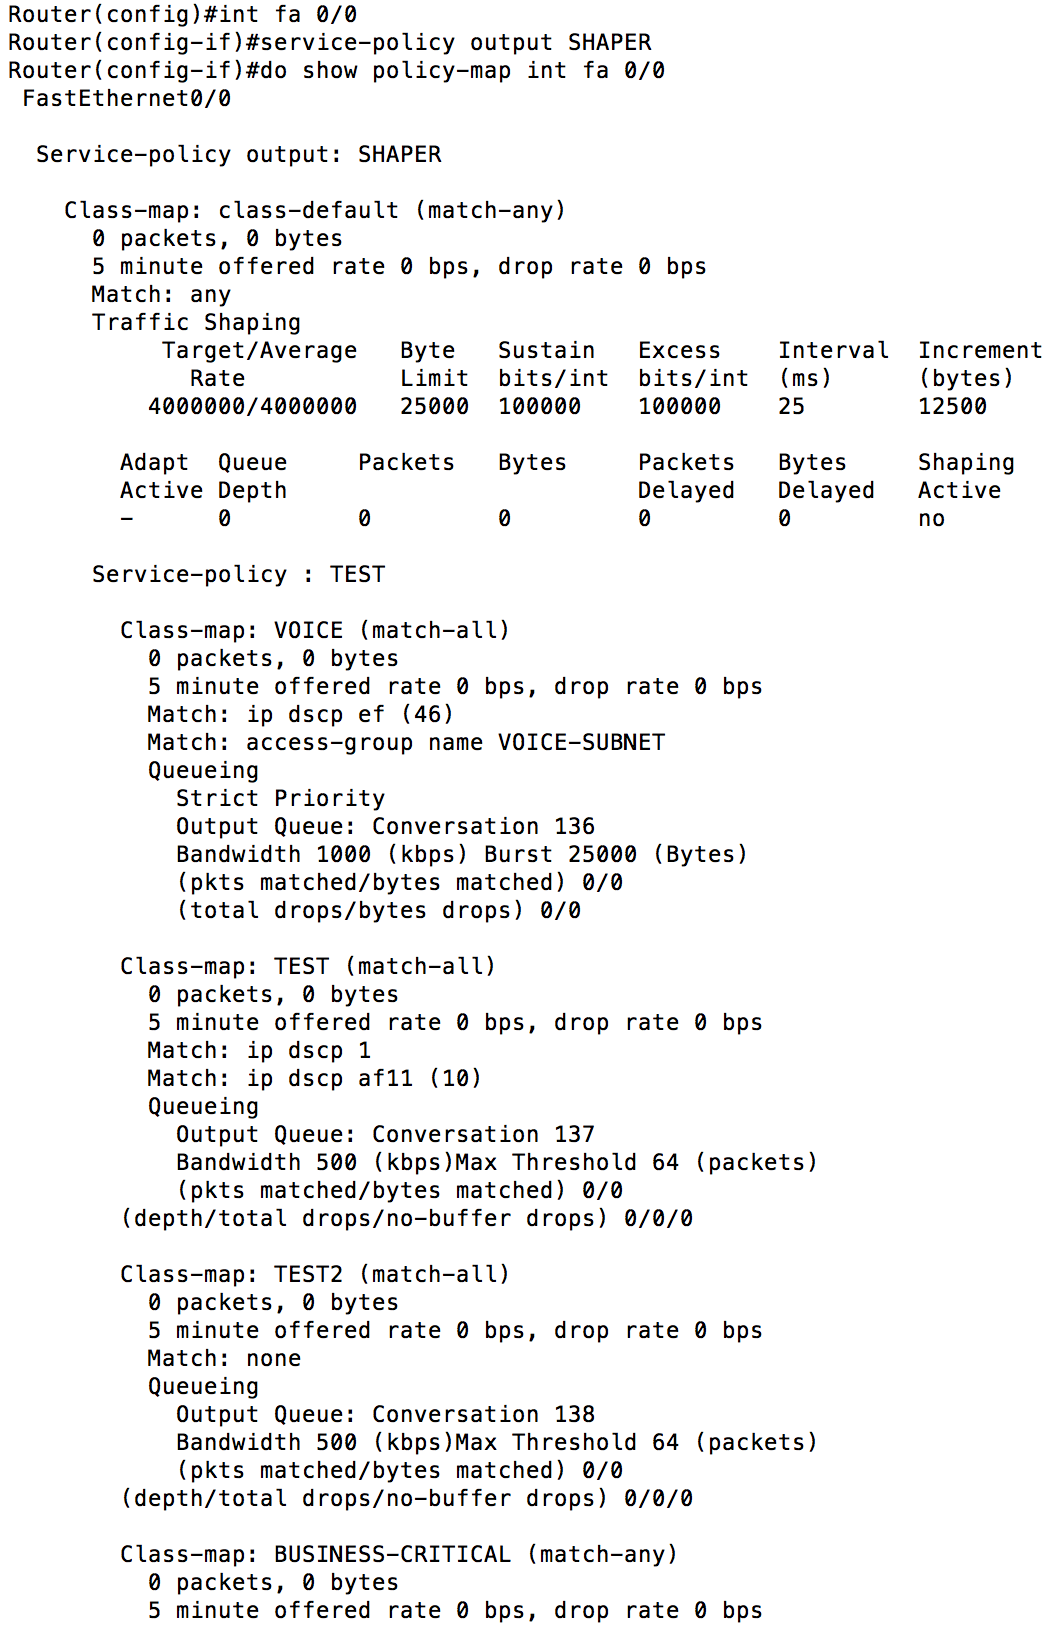
That completes Step 2 and moves us to our third and final step, applying our policy. Thankfully, this one is pretty easy. Here is what it looks like:
You can see from the output above that you simply apply your policy map as a service policy to the physical interface. From the show command output, the major thing you want to pay attention to are your pkts matched/bytes matched and your drops. You want to make sure that your pkts matched are a non-zero value (assuming you expect that traffic is currently passing over the interface) and the drops to see how effective your policies are (the output above is all blank because there is no traffic on the interface I applied this on). Drops are normal and to be expected, especially in the class default queue, however, they should be zero or near zero for your priority queue (voice). The most frequent reasons I have found for issues here are either an incorrectly written/applied ACL, or looking for traffic that is supposed to have been marked (DSCP values) and either isn’t marked, or isn’t marked properly. This is where your good buddy Wireshark comes in.
A few tips before I conclude the post:
- If you are using QoS on a tunnel, you apply your shaping policy on the physical interface. Be sure to use the command “qos pre-classify” on your your tunnel interface otherwise the router will not be able to properly classify your traffic.
- Manually configure bandwidth statements on interfaces that you will use QoS on. The values are used for QoS purposes.
- Remember that if you are dealing with QoS for a unclassified network with classified traffic tunneled over it you will not be able to “see” any of the classified IPs. This will change how you go about classifying that traffic.
- When in doubt, look at the packets. Wireshark will be your #1 troubleshooting tool. Use it.
